 AudioBlog
AudioBlog
AudioBlog
by Jared West
Service Host SuperFetch: What Is It and Ways To Disable It in 2023 - Microsoft's latest software made a lot of progress after its launch. It offered a lot of new features and comes with a great user-interface. Microsoft developed on the previous version and added several processes to improve the performance of a PC.
Contents
Some of the features that were present in Windows 10 worked perfectly, while others didn't produce as much result as was expected . The features that didn't perform well have however worsened the performance of PC's today. Among these new features, SuperFetch though useful, can create setbacks in computer performance. The issue of high disk usage and slow response in Windows 10 are encountered as a result of these negative features present in the system.
You may have come across a high disk usage problem on your Windows PC. This problem is attributed to Service Host SuperFetch. The feature of ServiceHost SuperFetch in Windows 10 system process, consumes a large amount of memory storage usually seen in the task manager.
SuperFetch is a feature present in Windows systems that can optimize the speed of launching an application. Its processes are carried out by preloading selected apps based on their usage patterns. The initial introduction of this feature was in the Windows Vista which stood as a successor to PreFetch, known to be present in Windows XP. When a newer generation of Windows was released , SuperFetch followed suit.
The system accumulates residue files (caches) of every application and program on the PC. It does this for the proper execution of the SuperFetch feature. SuperFetch processes can create a cache data of every one of the programs and applications of the PC. It carries out this feature with the help of a lightweight algorithm. It is crucial for you to know that these caches are created according to how often the App is being used.
SuperFetch oversees each application process on your Windows 10 PC. It does this with the aid of the main memory manager. SuperFetch gathers some cache memory when frequently used applications are closed. That means your PC system wouldn't have to run the program all over again the next time you open the program. In short, a little time would be all it takes to run your program due to the presence of the cache data in the system.
SuperFetch is of great importance but it comes with its con. You might be wondering why SuperFetch takes up disk storage when its main purpose is to speed up the system processes. It is because there's a cost to pay for the SuperFetch feature to work properly on your Windows 10 PC.
For the program to be executed properly, cache data of some programs have to be created . Subsequently, the caches would aid in running your frequently used applications. Also, keep in mind that the whole process leading up to the main memory manager takes a certain amount of RAM space.
There are some more reasons why ServiceHost affects user operation. SuperFetch in some cases can malfunction on its own. It doesn’t know when to stop its processes and when to pre-load a particular program process. Sometimes, all the processes can be operated at the same time. However, all the processes can later be executed in sequences instead of been operated at a time.
Several gamers also complain about SuperFetch reducing the frame rates of games. Some also say that there is a sudden increase in memory due to the SuperFetch processes. The state then becomes critical when the system freezes.
At some point, SuperFetch processes might seem to have subdued your PC's system. You probably would have gotten irritated with the whole process. In the long run, you should consider disabling the service or keep on with it. Questions may arise like “what benefit does it give to my PC?” “Should I disable SuperFetch?” .Would there be consequences by disabling the SuperFetch process?
Interestingly, disabling the ServiceHost system will not put your PC at risk. Unlike the errors and issues you face when you disable a program on your PC, SuperFetch can be put away without having major errors. SuperFetch is, however, a process that has to do with memory management. Therefore, getting rid of it won't affect your Windows PC.
There might be some slight inconveniences when SuperFetch is disabled on your PC. The ServiceHost system makes operation on your Windows PC efficient with memory management and cache data. That entire burden would solely lie on your Windows 10 after you’ve disabled. Since SuperFetch processes speed up your PCs operation, you might encounter some minor problems like slow response while opening applications and programs. It might also take a longer time to boot and some minor system bugs. After disabling the ServiceHost system, you'll get an optimum disk usage.
Your Windows issues may be solved once and for all after disabling the Service host system. Note that you might encounter some minor issues with your Windows PC's performance in the future . So far, we have not received any complain after disabling SuperFetch processes in Windows 10. We advise you to take note of any changes you might come across after disabling the ServiceHost system. If you discover disabling your SuperFetch process didn't make any much difference in your PC's performance, you can just turn it back on.
Below, we’d be showing you how you can disable SuperFetch.
In applying this method, you can finally do away with high disk usage in Windows 10 system.
Disabling the ServiceHost is quite easy. Windows 10 has a friendly user interface that can get you to the ServiceHost.
Below are steps to follow in disabling SuperFetch:
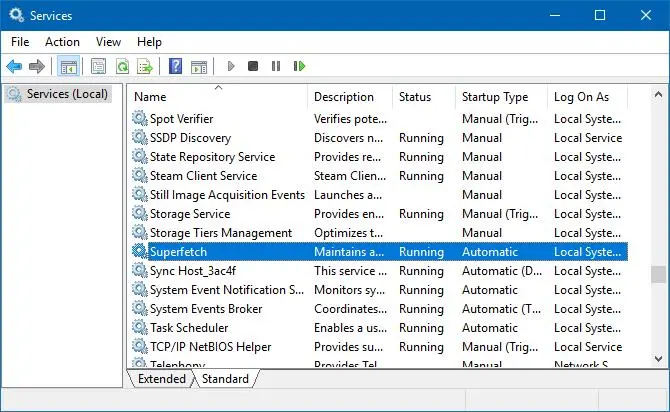
· Click on the Start Menu.
· Locate the search bar and type "services".
· Click on the enter button.
· A list would appear before you, look through and find SuperFetch.
· Thereafter, right-click on it.
· Go forward to pick the "properties" option.
· Afterward, locate the startup type and then set it to disabled.
· A Stop button would appear, click on it to stop the service.
· To complete the whole process, click on the OK button.
There you have it; you have successfully disabled SuperFetch on your Windows 10 PC.
Another way to disable SuperFetch on your Windows PC is by using a command prompt. The command prompt would effectively disable the ServiceHost immediately. All you have to do is to follow these steps highlighted below.
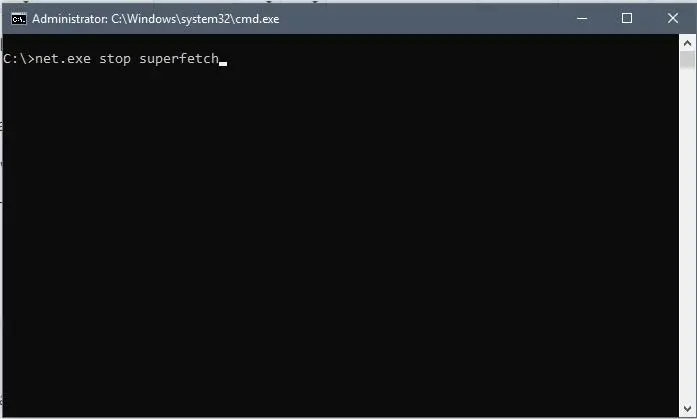
· Click on the Start Menu.
· Locate the search bar and type "cmd".
· Click the enter button and a list of programs would be displayed before you.
· Afterward, find best the match for your search and right-click on it.
· Click on the "Run as administrator" option.
· After launching the program, a blank space would appear, then type "net.exe stop superfetch " on it and click on the enter button.
· To finish up the process, type "sc config sysmain
· Finally, click the Enter button.
If you’ve completed all this, then you’d have successfully disabled Superfetch
Registry Editor is another simple and efficient way to disable SuperFetch on your Windows PC. As long as you're an administrator, Windows gives you access to change anything on your PC. The same applies to the use of the Registry Editor.
Follow the simplified steps below to use Registry Editor in disabling SuperFetch on your Windows PC.
· Click on the Start Menu.
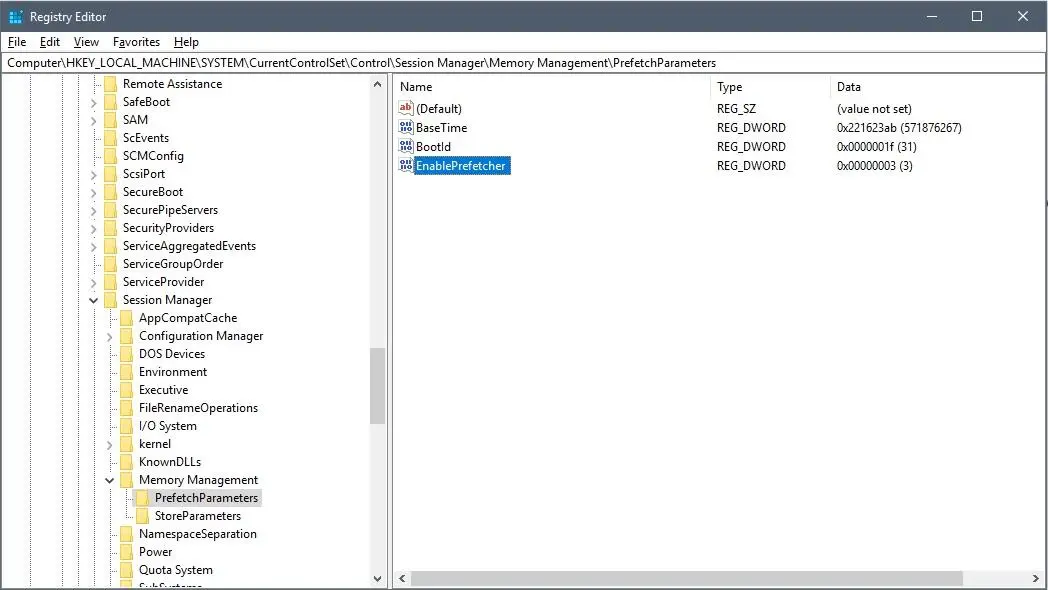
· Locate the search bar and type Registry Editor.
· Find the best match for your search and then click on it to launch the program.
· after opening the program, find the search bar and type the following "Computer\HKEY_LOCAL_MACHINE\SYSTEM\CurrentControlSet\Control\Session Manager\Memory Management\PrefetchParameters"
· Afterward, locate the "Enable SuperFetch" key.
· Make a double click on it.
· Change the value from "1" to "0"
· Click on the OK button.
· Then close the Registry Editor.
· Finally, restart your PC.
Using this method, you can locate the Service host from your Windows in other to disable it. All that's required of you is to change the service settings to disable it. Follow through the highlighted steps below to disable SuperFetch in your Windows 10 PC.
· Click on the Start Menu.
· Locate the search bar and then type "Services".
· Click on the best match option to launch the program.
· After opening the program, find "SuperFetch"
· Make a double click on it.
· Go for the "Disabled" option on the properties.
· Then click on Stop.
· Afterward, restart your PC.
We hope you find this article very helpful.

About Jared West
Jared's unique approach to audio writing involves meticulously crafting intricate sound designs that serve as the foundation for his narratives. Through careful selection and manipulation of sound effects, ambient noise, and music, he weaves together a tapestry of auditory sensations that bring his stories to life.
 |
 |
 |
 |
Check These Out
Time for FREE Giveaways, and Free Gifts to show our gratitude.
Reveal all teh data by disbling adblock. Hit a button below to show all
|
|
|
|